Thursday, June 9, 2011

Clark U Bake Off

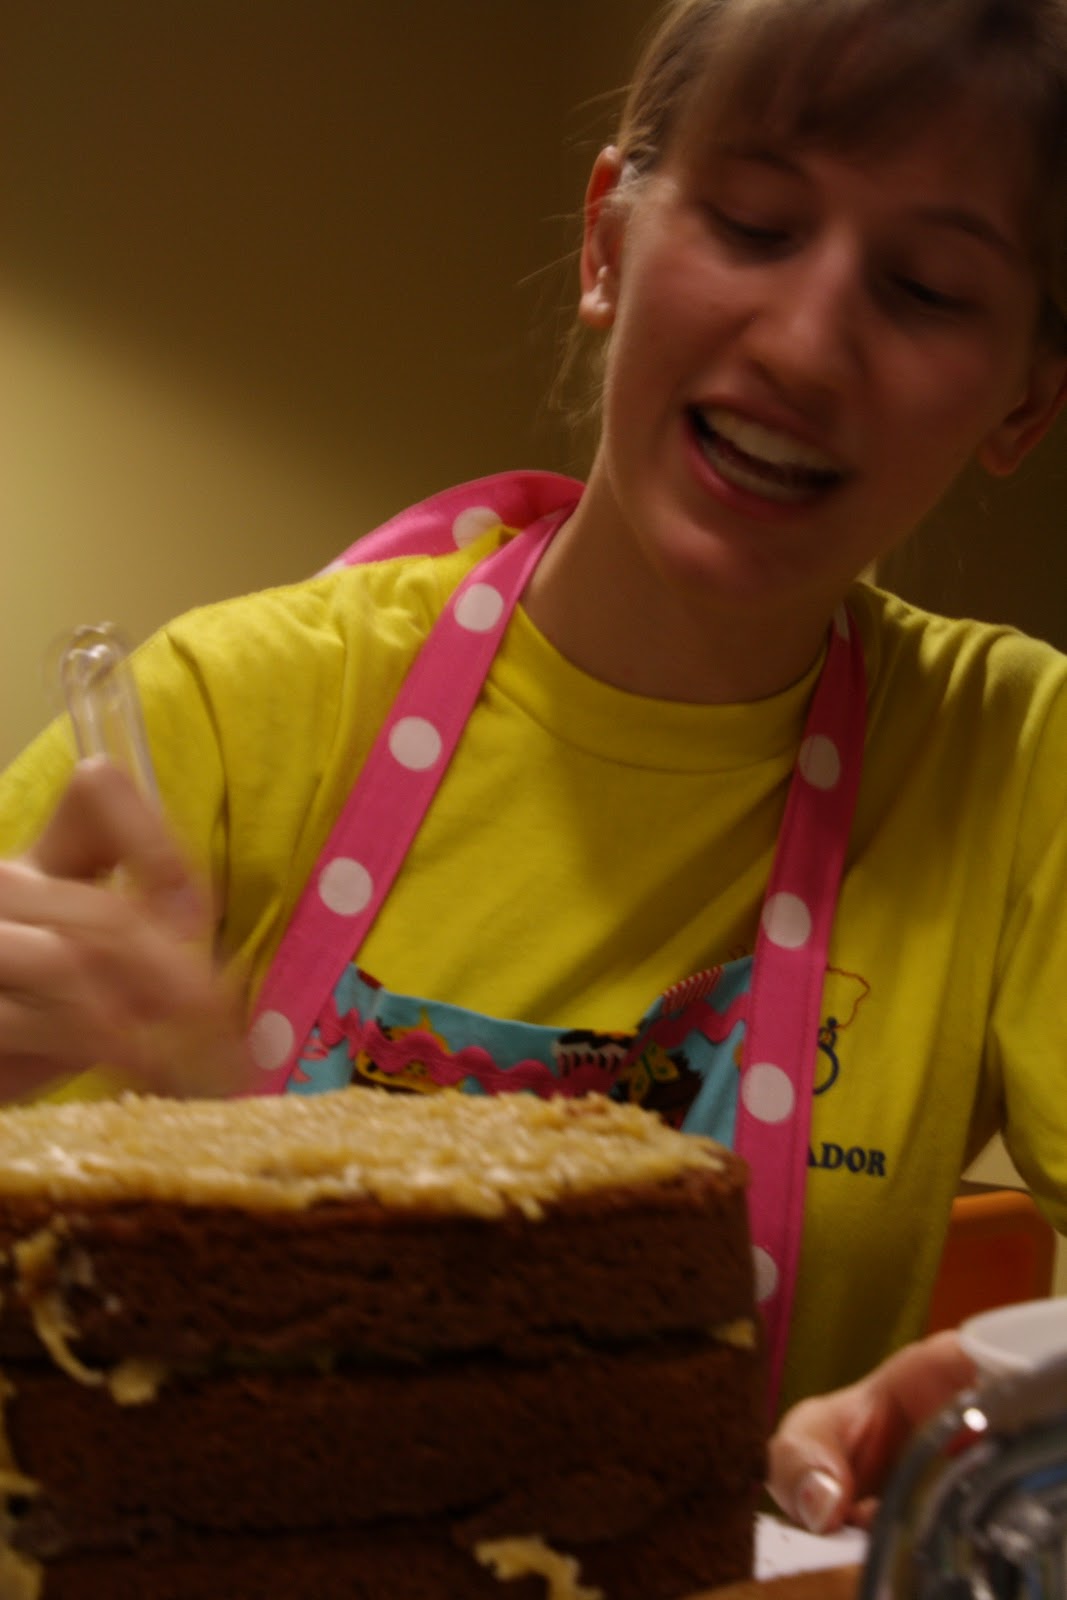
In March (I know, I know, I'm very behind on posting), one of the management classes at Clark put together a bake-off to raise money for the local organization called Abby's house, which is a shelter for battered women and children. For canned goods (or two dollars) Clark students could have all you could eat baked goods and then vote for best overall and most creative.

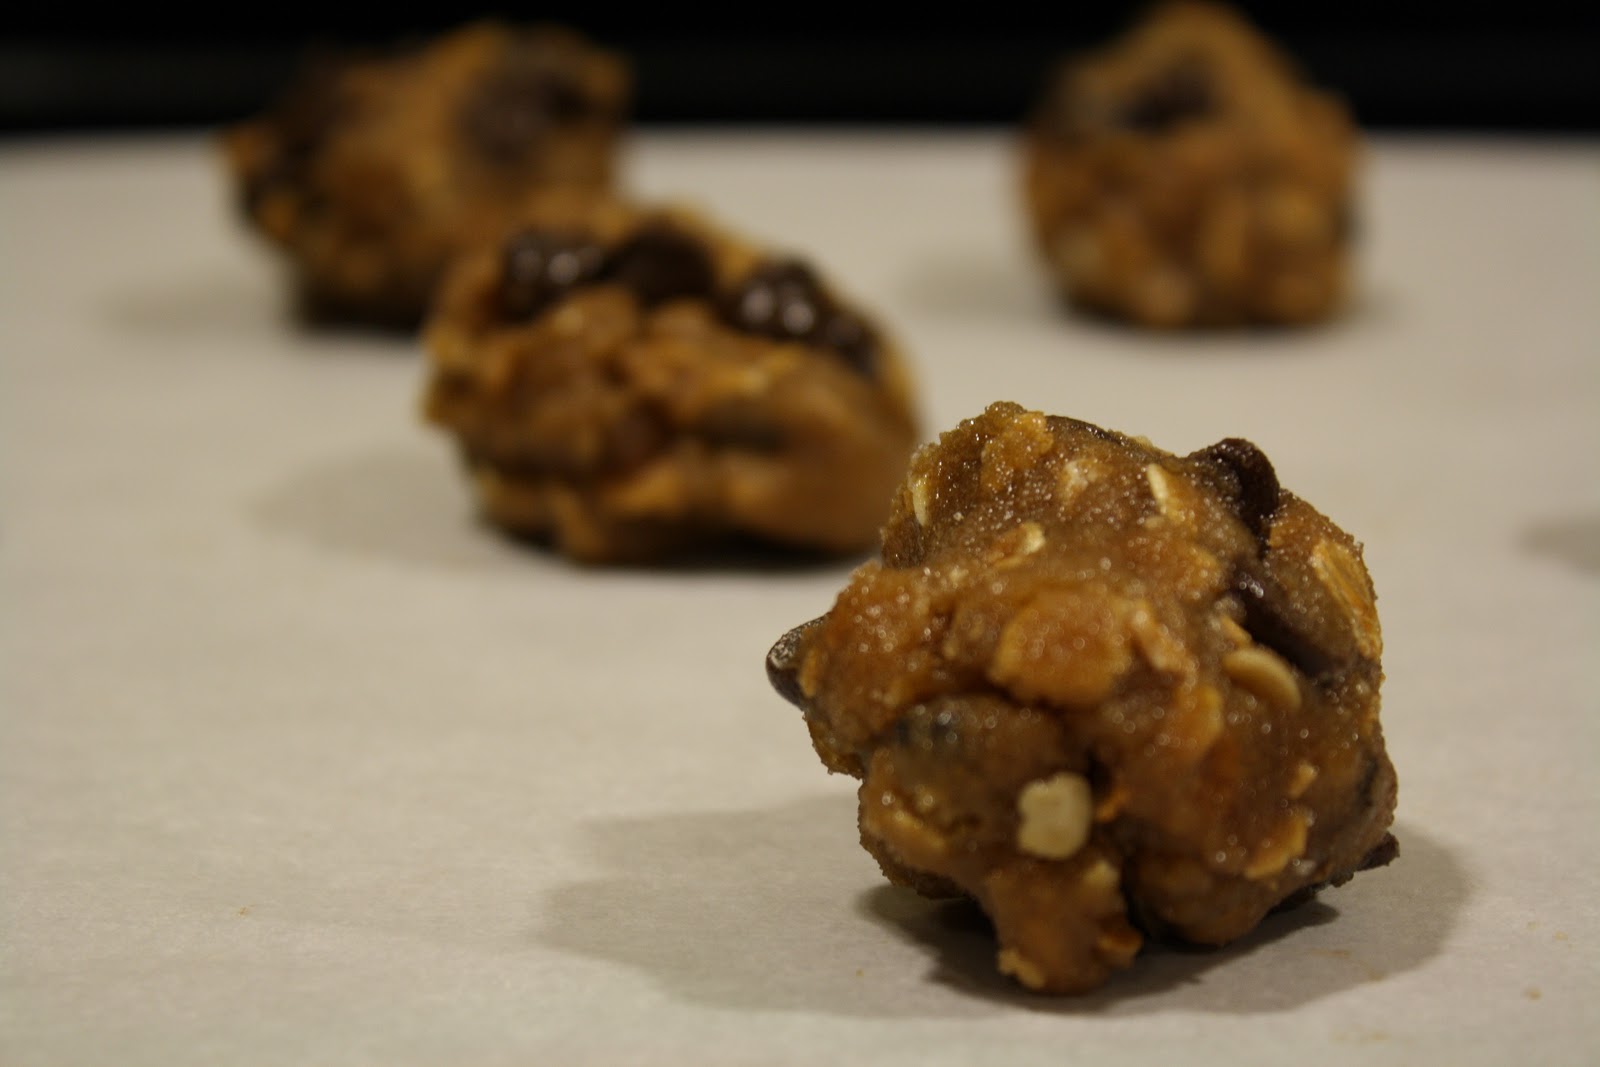
After Clark's 2009 cupcake competition (in which my key lime cupcake, a vanilla cupcake with key lime filling, meringue topping and a Graham cracker crust, COMPLETELY LOST) my pride was a little bruised and I was tentative about entering another competition. These feelings combined with the fact that I could not make the entire bake off because it conflicted with a concert the same night I was going to in Boston, I made the decision to under-achieve. Although I didn't go all out, I did take the opportunity to make a slightly complicated cupcake I had been dying to try. It was a chocolate peanut butter cupcake off of a cute blog called Made with Pink. This treat consists of a chocolate cupcake with a Reece's peanut butter cup at the bottom and peanut butter frosting. Click here for the recipe.

Now, of course, I did make some changes. Reece's peanut butter cups are very expensive to buy 30 of, especially on my college student budget. Thank goodness Easter was approaching, so I used Reece's peanut butter bunnies, which were on sale and added an interesting twist. Also, the original recipe calls for a peanut butter- butter cream frosting. Now, I know this is weird, but I don't really like butter cream frosting. Its too sweet and reminds me too much of the grocery store cake frosting - thick, hard to swallow and overly sweet. On top of this, I'm a sucker for cream cheese frosting. Its smooth, tangy but just sweet enough, and who doesn't love more dairy? Lucky for me, Martha Stewart has a recipe for peanut butter frosting with cream cheese! oh and heavy cream (just for kicks).

The cupcakes were interesting. The recipe calls for coffee. I only had instant, which was way to strong but overall the flavor wasn't too intense. The cupcakes had a unique texture; not dense and crumbly (how I like them), but more spongy and flaky. The frosting was sublime, however, and really pulled everything together. And the Reece's bunny? delicious. To try and add some creative flair for the bake off I melted some chocolate and drizzled it over the top, making them look quite pretty.

I didn't have my camera on me, so this shot is courtesy of Victoria Krinsky

I didn't end up winning anything from the bake off (which I suspected), but I also didn't try very hard. Overall it was a very fun experience and I'm glad I had a reason to try a new recipe. Oh and the reception of the leftover cupcakes (which I gave to the wonderful Heather Howe for her 21st birthday) were received especially well by friends and strangers alike. That made me feel better than winning a bake-off any day. :)


Me at the bake off with the final product! (photo by Victoria Krinsky)


Sunday, March 27, 2011

A Thank You

Almost a month ago I was preparing to take my dreaded EMT state exam. I took my EMT class a year ago and was finally getting around to be certified. Lets just say I forgot A LOT of stuff and needed some help. Enter Toby Maak- EMT extraordinaire. Really though, Toby is one of my friends from freshman year when we both decided to take accelerated introduction to chem. He has been an EMT now for three years at Clark and has helped many, many students pass their tests. Toby spent about 8 hours with me overall the week of helping me practice, and I couldn't thank him enough. 
Another thank you goes out to Alicia Winn, a wonderful girl in SASC with me. For the actual test (which was from 7-12 and an hour away AND on a Saturday) I desperately needed a patient. Alicia volunteered herself and I couldn't have been more grateful! She made the day go by quickly and calmed my nerves before every station.

 So I needed to say THANK YOU! to these wonderful people, and I knew exactly how I should do it. Baked goods. Everyone loves them and needs them. I wanted to bake something simple (it was midterms) but delicious, and easy to transport. That is when I decided to give cake balls a try. I know the name is weird and might make you giggle - but seriously - these are amazing. Make a box cake, let it cool, crumble it up, put frosting in it, shape it into balls, let those cool, and dip them in chocolate!!!!!! I made red velvet ones. An although I very much so dislike making boxed cakes, they turned out incredible. The hard chocolate contrasts textually with the gooey sweet cake in the middle making for a wonderful experience in you mouth. mmmmmmm. And guess what? they are really trendy right now too. You can even go buy one at starbucks. (but trust me, homemade is better).

I'm envisioning white chocolate funfetti ones in the future, but for now, check out this link to see a pretty picture  and the official recipe by Bakerella! http://www.bakerella.com/red-velvet-cake-balls/
Sorry I didn't take any pictures. my hands were too covered in chocolate. :)

Wednesday, March 16, 2011

mmm...Deutsch Schokoladenkuchen (also known as German Chocolate Cake)

The was #3 on the RA birthday cake challenge, and quite the surprise of a cake. When you hear "German chocolate cake" you see the chocolate cake and that coconut frosting, right? and it doesn't really look or even sound that hard to bake - but just wait - it is. The recipe I happened to choose was from Rachel Ray (whom I usually never use) who got it from someone named Trisha Yearwood (a fabulous baker i'm guessing). I chose it because it looked the easiest and had the fewest ingredients. But I've learned that no cake with three layers can be THAT easy.

this cake has many steps and components: melted chocolate, the cocoa-sugar-butter mixture, the flower mixture, beaten egg whites, and buttermilk- you know it has to be a good cake if it has buttermilk in it.
Good thing I had bought some new aluminum pans. :)

After mixing all of the ingredients, the egg whites are folded into the batter, making it extremely fluffy. I think this caused the cake to have the perfect balance between density and spongy-ness, making for an amazing texture.While the cakes cooled I made the coconut frosting, which took FOR-EV-ER. I suggest to not be too timid with turning up the heat, or else you will never finish it. Also the frosting turned out very thick, so I think I might have messed up somewhere. It still tasted delicious though, so I don't really know.

Below are the pictures of me assembling and frosting the cake, courtesy of Matt Warndorf.
candid shot!


This picture shows the three layers quite well


Below is the picture of the actual cake - and everyone who enjoyed eating it!

Lots o' texture


even Sarah helped!


very very very good


the taste

the reaction


Recipe is below (obtained from Rachel Ray's Website)

Ingredients

  • 4 ounces sweet dark chocolate (see Shopping Hint below)
  • 1 cup (2 sticks) butter, at room temperature
  • 1/4 cup warm milk
  • 2 1/2 cups sifted cake flour
  • 1 teaspoon baking soda
  • 1/2 teaspoon salt
  • 5 medium egg whites
  • 2 cups sugar
  • 5 medium egg yolks, at room temperature
  • 1 teaspoon vanilla extract
  • 3/4 cup buttermilk, well shaken
  • For the coconut frosting:
  • 1 cup sugar
  • 4 medium egg yolks
  • 1 cup evaporated milk
  • 1/2 cup (1 stick) butter
  • 1 teaspoon vanilla extract
  • 10 ounces fresh or frozen and thawed grated coconut
  • 1 1/2 cups finely ground pecans, walnuts, or almonds
  • 1/4 cup warm milk

Yields: 12 servings

Preparation

Prepare the chocolate by melting it in the top of a double boiler, stirring until it is smooth. Add 1/4 cup (1/2 stick) of the butter and stir until it is melted and blended. Add 1/4 cup of warm milk and stir until smooth. Set the chocolate aside to cool.
Preheat the oven to 350ºF.
Line the bottoms only of three 9-inch cake pans with circles of parchment paper, or grease each pan bottom only with solid shortening and dust lightly with flour. Sift together the sifted and measured flour, baking soda, and salt.
Whip the egg whites until stiff using the wire beater of the mixer. Transfer the beaten whites to a separate bowl and set aside.
In the mixer bowl, cream the remaining 1 1/2 sticks of butter and sugar together until fluffy. Add the egg yolks one at a time, beating well after each addition. Add the melted, cooled chocolate and the vanilla. Mix well.
With the mixer on very low, stir in the flour mixture alternately with the buttermilk. Do this by adding about a third of the flour and slowly stirring it in completely. Then add about half the buttermilk and stir it in. Continue adding flour and buttermilk in this manner, ending with flour. Scrape the sides and bottom of the bowl and stir again. With a long-handled spoon or spatula, fold and stir the beaten egg whites into the batter until the batter is smooth with no visible clumps of whites.
Divide the batter evenly between the prepared pans and bake for 30-40 minutes. Bake on the middle rack of the oven, allowing at least 1/4-inch clearance between the pans and the oven walls. The cake will rise above the pan edges as it bakes but will not spill over and will settle back down as it continues to bake. The cake is done when it begins to pull away from the sides of the pans and springs back to a light touch. Cool layers in the pans for about 8 minutes.
Run a knife around the edges of each pan and turn the layers out onto wire racks that have been sprayed with cooking spray. Cool layers completely before frosting.
To make the frosting, combine the sugar, egg yolks, and evaporated milk in the top of a double boiler. Stir with a wire whisk until the yolks are fully incorporated. Add the butter. Place over simmering water and bring to a boil (see Note below). Simmer for 12-15 minutes longer, stirring constantly, until the mixture thickens. Add the vanilla, coconut, and nuts. Cool.
To assemble the cake, place one layer on a cake stand and spread with frosting. Frost each layer completely, top and sides, as it is added to the cake.
Note: You can also make the frosting in a regular saucepan, but be sure to stir it constantly, as it scorches quite easily. Also, you must use the finely grated fresh or frozen coconut, not canned or shredded, to be able to spread the frosting on the sides of the cake easily.


Sunday, March 6, 2011

Cookies with a CRUNCH!

The other day I was feeling daring and bought some Muesli from the grocery store. I didn't really know what it was other than an oat-like cereal that is supposed to be good for you. After further research, I found out that the cereal was a combination of raw oats, nuts and dried fruit. It originates from switzerland, where it was created by a physician (no wonder I was drawn to it...) who gave it to his patients. It can be bought in the packaged form or made fresh, and can be eaten hot or cold. It is normally mixed with milk, fruit juice, water or yogurt and is traditionally left to soak overnight.

Basically - its super versatile. so versatile that the bag had a chocolate chip cookie recipie on the back. YES!!!! so one thursday night when I was craving some sweets, I whipped some up.

Mixin' up all the ingredients
The recipe calls for applesauce, but I didn't have any so I used vegetable oil. The dough was very oily so I added more flour and some white granulated sugar.  

coooooKIE dough! 


And if you think that looks good - just wait until they come out.
deliciously formed and shaped!
I'm pretty sure I ate 5 of them right then and there. the ones with extra flour and sugar were ore cakey and sugary and I liked them muuuch better. :)

Chocolate Chip Muesli Cookies (taken from the back of Bob Mill's Old Country Style Museli)
  • 1 c. museli 
  • 3/4 c. flour (the package calls for whole wheat, but regular is fine too)
  • 2/3 c Applesauce (oil works too!)
  • 3/4 c. brown sugar 
  • 6 oz chocolate chips
  • 1/2 t. baking soda
  • 1/2 t. salt
  • 1/2 t. vanilla
  • 1 Egg
Heat oven to 375 degrees. Sift flour, baking soda and salt together and set aside. Blend applesauce, sugar and vanilla together. Beat in egg. Add flour mixture and mix. Stir in Museli and chocolate chips. Drop tablespoons on a cookie sheet and bake for 10-12 minutes.

and ENJOY!


Sunday, February 20, 2011

the most amazing cake you will eat this year. NO JOKE.

The Market in the winter
i'll admit it's an interesting combination.

white zucchini cake, cream cheese frosting, and fruit. but not just any fruit- mandarin oranges, kiwi's, grapes, mango, and strawberry. (just think about that one for a little bit).

I know it seems crazy, but it works. it works really really well. This cake is called the "Spring Fling" cake and it originates from the wonderful Denver Colorado (my home) from a very well known cafe downtown called The Market. I have frequented the market many times before in my life and have to say I thoroughly enjoy it. However, I normally just stop by to get coffee. On a particular day this past December, however, I happened to decide to splurge on a piece of cake, and the attendant recommended the Spring Fling.

After the first bite I immediately knew I had to try to re-create it. But for what? My friend Sarah offered for me to make it for her birthday. I gladly accepted.

strawberry, strawberry, strawwberryy
The cake itself is not hard to make at all. The most time consuming part was grating the zucchini. The assembly of the cake though, is where the time commitment comes in. You need to slice the cake into three layers, then frost and put the layers of fruit on each later. The end result was so worth it though, the cake was beautiful, and well received. Sure, I did take it to a 21st birthday party, and sure that probably means that the compliments were exaggerated a little, but the adoration from the fans of this cake was enough to boost my baking ego into one of those string theory parallel universes. Probably one full of cake.
I just love the texture of the frosting!


Here is the recipe, courtesy of Malisa's Food Blog


The whole thing - finally assembled!
Spring Fling Cake

Serves 12 to 14

2 ½ cups shredded zucchini
5 eggs
1 ¼ cups sugar
¼ cup vegetable oil
1 cup sour cream
½ tablespoon plus ½ teaspoon vanilla extract (for frosting)
3 ½ cups all-purpose flour
½ teaspoon baking soda
½ teaspoon baking powder
Pinch of salt
For frosting:
¾ cup cream cheese
¼ cup butter
2 cups powdered sugar
½ cup heavy cream

Fruit for cake:
1 pint strawberries, cleaned, stemmed and sliced
4 kiwi fruit , peeled and sliced
2 mangoes, peeled and sliced
1 pint blackberries or black grapes
1 can mandarin oranges, drained (optional)
Apricot glaze, or apricot jelly thinned out with a bit of warm water (optional)

• Preheat oven to 350 degrees. Grease and flour a round 10-inch cake pan.

• To prepare the cake: Shred the zucchini in a food processor. In a large mixing bowl combine shredded zucchini, eggs, sugar, oil, sour cream and ½ tablespoon vanilla.

• When thoroughly mixed, combine all dry ingredients and add to bowl; mix well. Batter should be fairly wet and easy to pour.

• Pour in the batter and bake for 50 to 70 minutes, testing with a toothpick in center.

• Cool finished cake on a rack for 10 minutes, then remove it from the pan and allow it to cool completely. (You can make the cake a day ahead and refrigerate.)

• To prepare frosting, whip room temperature cream cheese and butter until smooth. Gradually add the powdered sugar, mixing until well combined.

• In a separate bowl, whip the cream until stiff, and then fold it and the ½ teaspoon vanilla into the frosting. Do not overmix.  (I think the frosting resembles sweetened condensed milk.)

• To assemble cake: Cut the cooled cake in half lengthwise, making two layers. (The Market cuts the cake into three layers, which you may do if desired.)

• Spread an even layer of frosting over the first layer, and then add a layer of the various fruit pieces (repeat if three layers).

• Put on the top layer of cake and evenly frost. The sides of the cake are not frosted; use extra to fill in, as needed. ( I frosted the sides - I like more frosting in more paces!)

• Arrange the fruit in circles all over the top of cake, slightly overlapping fruit pieces.

• To finish: Spread the apricot glaze over fruit on top of the cake with a pastry brush. (I didn't do this but it still turned out fine)

Wednesday, February 16, 2011

Holy Moly thats a good Roly Poly!

Roly Poly's. I had never heard of them until one day when I was browsing my favorite baking blog, http://www.cakespy.com/. The cakespy is from Seattle, and I think with every post she tempts me to move there if only for their array of delectable bakeries. The following recipe is from one of those called the Macrina Bakery. The Roly Poly is basically a cinnamon roll on steroids. Not only is it made with crossoint dough, but the filling includes walnuts, raisins, AND coconut. Talk about a bite of heaven.

right after coming out of the oven
Now just to warn you - the recipe is not for the light of heart. It takes about a good full day of work to prepare these rolls and in no way is it easy. Me, being the smart biochemistry major I am, decided to start them on christmas eve so my family could eat them christmas morning. This resulted in me rolling out the dough at least 4 times at my grandma's during out annual christmas eve dinner. so PLEASE think it through before you start.

What makes these rolls so hard is that the dough is a crossoint dough. The dough is made without any butter in it and then rises for 12 hours in the fridge (bizzare...I know). Then you make a "butter block" which is also chilled and add the butter to the cold dough by rolling it it (yes, with a rolling pin). After rolling you then fold and chill the dough, and roll out again and repeat. After all of this you can finally make the rolls, only to allow them to rise again in the fridge for 12 hours. PHEW its a long process.
mmmmmmm...sooooo gooood

But totally worth it.

my friends and family who came over that day could not stop raving about how good they were. and really, they are delicious. I guess that is the product of a professional grade recipe (its from a bakery that actually sells these things) and about a day's worth of work. The picture in the link below shows them frosted, but I just left them plain and they were sweet enough.

Click here for the Recipe


Saturday, February 12, 2011

The Year of the Cake: Starting with Strawberry

So I made a rather ambitious goal for myself (but really, when are goals never ambitious?). I told my RA staff that I would bake them their favorite cake for their birthday. With this task on top of my other friend's birthdays - I have been making quite a few cakes within the past month.

The first was Rachel's. She wanted funfettii, which of course I understand, but there was no way I could improve my baking skills from a box. Thus I opted for her second choice, strawberry cake. Now, I have this amazing cookbook that was assembled by my Nana that contains nearly every recipe she owns. Needless to say, it is one of the most beautiful books I own. It also is very usefully, because it has a strawberry cake recipe in it. I would trust the recipes in this book with my life - so I decided to give it a go.

 The recipe is originally from my Great Aunt Wolaka, whom I never met. It also is one of the few recipes I found that does not call for strawberry gelatin and vanilla cake mix - it is made from simple ingredients and frozen strawberries. (I would defrost the strawberries before baking to decrease the bake time.)And the frosting? A sugar-evaporated milk-pecan topping with the consistency of evaporated milk. Every cake in this book seems to have pecans incorporated in it somewhere. Its the country-southern influence.

Sadly I did not get a final picture of the cake. Rachel loved it though and so did most people. The frosting was VERY interesting and the flavor somewhat contrasted with the cake. I ended up adding waay more sugar to it and cooking the pecans with it to make it more nutty flavored and syrupy in texture. The outcome was interesting. Also, the cake did not have enough strawberry flavor for me. If I were to do this again I would have perhaps made also a whipped cream-strawberry frosting or perhaps whipped cream frosting with a strawberry-vanilla compote to enhance the flavor and make a more complementary frosting. However, some people really did like the cake just the way it was...

This is the mushed up strawberries on top of the dry ingredients. 


The beeeautiful pink batter!
Before putting into the oven. I got a little artsy with the pictures.


Recipe:

2 c. sugar
2 c. flour
1 t. baking soda
1 t. baking powder
1/4 t. salt
2 eggs
1/2 c. vegetable oil
1 16 oz package frozen strawberries, mashed.

Combine all dry ingredients. Add eggs, oil and strawberries (juice and all). Bake at 350 for 20-30 minutes.

Topping:
1 stick butter
1/2 cup sugar
1 small can evaporated milk (but really...what do you mean Great Aunt Waloka by small?)
1 cup pecans, chopped (optional- but good)

In small saucepan, boil butter sugar and milk for 4 minutes. Add nuts. Spread on cake while hot.